Friday, July 26, 2013

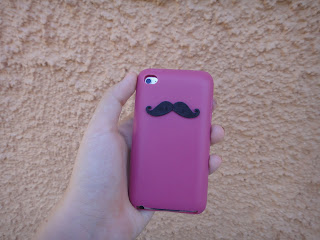
Moustache iPod case

After the moustache necklace tutorial and the moustache T-shirt tutorial here's how to make a moustache iPod case:

Συνεχίζοντας την μόδα από το moustache necklace tutorial και το moustache T-shirt tutorial ορίστε ένα tutorial για το πώς να φτιάξετε μια θήκη για το iPod  σας :


At first you have to find a moustache image and print it.
Αρχικά πρέπει να βρείτε μια εικόνα με μουστάκι και να την τυπώσετε.


Then trace it on your shrink plastic sheet.
Μετά μεταφέρετε το στο φύλλο από θερμοσυστελλόμενο πλαστικό ( shrink plastic )


As in the moustache necklace tutorial cut it, bake it and paint it.Your moustache is ready!
Όπως και στο moustache necklace tutorial κόψτε το, ψήστε το και βάψτε το.Το μουστάκι σας είναι έτοιμο!


Finally with your hot glue gun glue it on your plain case.
Τέλος με το πιστόλι σιλικόνης κολλήστε το στην άδεια σας θήκη.


Front:
Μπροστά:


Back:
Πίσω:


Wednesday, July 24, 2013

Ancient greek earrings tutorial

Hello!! We all love ancient and vintage jewelleries.That is why today we have an ancient greek earrings tutorial for you.


Γειά σας!! Σε όλους αρέσουν τα αρχαία και παλιά κοσμήματα.Για αυτό σήμερα έχουμε ένα tutorial για το πως θα φτιάξετε αυτά τα σκουλαρίκια που θυμίζουν αρχαία ελλάδα!!!


Wind the wire around the rosary pliers one time,as shown in the picture.

Τυλίξτε το σύρμα γύρω από το πενσάκι μια φορά (rosary pliers) όπως στη εικόνα.

Now wind the wire around the pliers one more time.And we are done with the half of the motive.

Τώρα τυλίξτε το σύρμα γύρω απο το πενσάκι για μία ακόμη φορά.Και τελειώσαμε το μισό μοτίβο.


So lets make the second half of the motive! Leave about 1cm space and start winding the wire around the pliers just like you did before.

Πάμε να φτιάξουμε το 2ο μισό του μοτίβου.Αφήστε περίπου 1εκατ. κενό και αρχίστε να τυλίγετε το σύρμα γύρω από το πενσάκι οπώς κάνατε και προηγουμένως.

When you finish cut the wire that is left and repeat the winding process 3 times so that we can make 4 motives!( 2 motives = 1 earring, 4 motives = 2 earrings)

Όταν τελειώσετε, κόψτε το σύρμα πού περισσεύει και επαναλάβετε την διαδικασία 3 φορές για να φτιαξουμε 4 μοτίβα σε σύνολο. ( 2 μοτίβα = 1 σκουλαρίκι,4 μοτίβα = 2 σκουλαρίκια)


Finally bond 2 motives with a jump ring and add the earring hook. (  x2)

Τέλος ενώστε 2 μοτίβα με ένα jump ring και προσθέστε το κούμπωμα.(x2) 


If you want add some beads as we did!!
And you have an amazing pair of earrings!!!<3<3

 Αν θέλετε προσθέστε μερικές χάντρες όπως κάναμε και εμείς !!
Και έχετε ένα Καταπληκτικό ζευγάρι σκουλαρίκια!!<3<3


Thursday, July 18, 2013

Mustache T-shirt


Moustaches are in fashion now, in T-shirts, in rings, in necklaces ( a tutorial on how to make a moustache necklace here ) To make your own moustache T-shirt you will need:

Black fabric paint
freezer paper
a paintbrush
scissors
a white T-shirt
a pencil

Τα μουστάκια τώρα είναι στην μόδα,εμφανίζονται σε μπλούζες , δαχτυλίδια , κολιέ κτλ (εδώ ένα tutorial για το πώς να φτιάξετε ένα κολιέ-μουστάκι)Για να φτιάξετε το δικό σας T-shirt με μουστάκια θα χρειαστείτε:

μαύρη μπογιά για υφάσματα
freezer paper
ένα πινέλο
ψαλίδι
ένα άσπρο T-shirt
ένα μολύβι


Firstly make a freezer paper moustache stencil ( you just draw a moustache on the freezer paper and cut it)Then iron the stencil on your T-shirt and with the paintbrush fill it with black color.
Αρχικά κάντε ένα freezer paper στενσιλ ( απλά ζωγραφίστε στο freezer paper ένα μουστάκι και κότε το)Μετά σιδερώστε το στένσιλ πάνω στην μπλούζα και με το πινέλο γεμίστε το με μαύρη μπογιά)


After it is dry remove the stencil!(your stencil can be used over and over again)
Αφού στεγνώσει αφαιρέστε το στένσιλ (το στενσιλ σας μπορεί να ξαναχρησιμοποιηθεί)


Your moustache is ready!Repeat for the other moustaches!
Το μουστάκι σας είναι έτοιμο!Επαναλάβετε για τα άλλα μουστάκια!


Wear your T-shirt proudly!
Φορέστε την μπλούζα σας υπερήφανα!


Tuesday, July 16, 2013

Wire ring tutorial

Today's tutorial needs only a few supplies:
Το σημερινό tutorial χρειάζεται πολύ λίγα υλικά:


SUPPLIES
wire
one small bead
some chain

ΥΛΙΚΆ
σύρμα
μια μικρή χαντρούλα
λίγη αλυσίδα


Firstly form a word like ''love'' with some wire.Don't forget to add a bead in the process ;) it's all about the detail!Because I didn't manage to make a tutorial for this here's a link to another's blog tutorial : http://www.swellmayde.com/2013/01/valentines-diy-wire-love-ring.html

Αρχικά δημιουργήστε μια λέξη με σύρμα πχ love.Μην ξεχάσετε να προσθέσετε ανάμεσα μια χαντρούλα ;) σημασία έχει η λεπτομέρεια ! Επειδή δεν κατάφερα να κάνω tutorial  για αυτό ορίστε το λινκ για ένα παρόμοιο σε ένα άλλο μπλογκ:  http://www.swellmayde.com/2013/01/valentines-diy-wire-love-ring.html


Take a piece of chain which conbined with your word makes the size of your finger.With your pliers open the last link and pass it through the loop of the first letter.Close it.

Πάρτε ένα κομμάτι αλυσίδας το οποίο μαζί με την λέξη σας είναι στο μέγεθος του χεριού σας.Ανοίξτε τον τελευταίο κρίκο και περάστε τον στην θηλιά που δημιουργεί το πρώτο γράμμα.Κλείστε.

Repeat for the other side too!
Επαναλάβετε και για την άλλη πλευρά!

And you are done!
Και τελειώσατε!


Easy peasy!
Πανεύκολο!


Thursday, July 11, 2013

champagne cap bracelet

Hello!! Here is a tutorial on how to transform a MARTINI champagne cap into a simple and unique bracelet <3

Γειά σας!!Σας έχουμε ένα tutorial για το πώς μπορείτε να μετατρέψετε ένα καπάκι από σαμπάνια MARTINI σε ένα απλό και μοναδικό βραχιόλι!

Take the champagne cap
Πάρτε το κούμπωμα της σαμπάνιας


And cut the wire in the bottom

Kαι κόψτε το κάτω σύρμα

 Now pull one leg up, so that you can easily remove the base

Τώρα τεντώστε το ένα σιδερένιο πόδι της βάσης για να μπορεσετε να αφαιρέσετε το στήριγμα

 Take the cap and glue blue cord in the wrong side of the cap!

Πάρτε το καπάκι και κολλήστε ένα μακρύ μπλέ κορδόνι στην κάτω πλεύρα του!


 Glue the blue cord in the front side of the cap just like the picture

Κολλήστε το μπλέ κορδονι στο καπάκι

  Turn the cap on the wright side and tie a knot.

Γυρίστε το καπάκι από την αναπόδη πλεύρα και δέστε ένα κόμπο.


 Finally glue a double blue cord to the wrong side of the cap

Τέλος κολλήστε ένα διπλό μπλέ σκοινί και στα δύο άκρα του κουμπώματος


And you are done <3<3

                                                     Και τελειώσατε <3<3!!


Monday, July 8, 2013

Frame earring holder

Γειά σας !!Σήμερα θα σας δείξουμε πώς θα φτιάξετε τη δική σας προτότυπη μπιζουτιέρα για σκουλαρίκια<3

Hello :D !! Today we will show you how to make your own earring holder <3


For this project you will need : 
A picture frame 
some wire
and 
scissors 


Για αυτή την κατασκευή θα χρειαστείτε 
μια κορνίζα
λίγο σύρμα
και 
ένα ψαλίδι

<3<3<3<3<3<3<3<3<3<3<3<3<3<3<3<3<3<3<3<3<3<3<3<3<3<3<3<3<3<3<3<3<3<3<3<3<3

Twist the wire around the one frame side and end up to the other !

Tυλίξτε σφυχτά το σύρμα απο τη μια πλευρα της κορνίζας στην άλλη !


Do the same to make the 3 other rows 

Κάντε ακριβώς το ίδιο για να φτιάξετε τις άλλες 3 σειρές 


Now you can hang your collection of earrings
And you are done <3<3 so simple !!

Τώρα μπορείτε να κρεμάσετε τη συλλογή με τα σκουλαρίκια σας 
Και τελιώσατε <3<3 τόσο εύκολα !!