Showing posts with label ring. Show all posts

Saturday, September 27, 2014

gift for mum


Hi :)


For this project you will need a ring base (I painted mine blue)
θα χρειαστείτε μια βάση για δαχτυλίδια(την έβαψα μπλε)


and small stones
και μικρές πετρούλες


there is no tutorial needed.Just glue them on the base with a silicone gun 
δεν χρειάζεται tutorial απλά κολλήστε τις με ένα πιστόλι σιλικόνης στην βάση


and happy crafting :)
καλή επιτυχία ;)

Sunday, February 23, 2014

Fox ears ring tutorial

Hey crafty merriers.Here is an adorable tutorial on how to make a fox ears ring.Watch the video and learn how to make your own.It is so easy !


Γειά σας craftymerriers.Να ένα tutorial για το πώς να φτιάξετε ένα δακτυλίδι με αυτάκια αλεπούς.Δείτε το παρακάτω βίντεο για να μάθετε πως θα φτιάξετε το δικό σας.Είναι πολύ εύκολο!


You will need:
white polymer clay
brown polymer clay
black polymer clay
orange polymer clay
fimo liquid deco gel
a ring
and a knife

Θα χρειαστείτε :
άσπρο,καφέ,μαύρο,πορτοκαλο-καφέ polymer clay
ένα δατυλίδι
ένα μαχαίρι
και  φιμο liquid deco gel


Friday, September 20, 2013

blue ring tutorial


So here's the tutorial we promised you last time.I had to make something quick and easy for a present so here's what I came up with:

Ορίστε το tutorial που σας υποσχεθήκαμε την προηγούμενη φορά!Έπρεπε να φτιάξω κάτι γρήγορο και εύκολο για ένα δωράκι οπότε ορίστε τι σκέφτηκα:

You will need one of these circular glass things which are in vases etc.I don't know how they're called but they are used for decorating.
Θα χρειαστείτε ένα από αυτά τα κυκλικά γυάλινα πραγματάκια που υπάρχουν σε βάζα κτλ.Δεν ξέρω πώς τα λένε όμως χρησιμοποιούνται για διακόσμηση.

Color the back of it with a blue marker.I used the Posca metallic blue.
Χρωματίστε την βάση του με έναν μπλε μαρκαδόρο, εγώ χρησιμοποίησα το μεταλλικό μπλε του Posca.

Then glue the base!It is ready in 5 minutes!
Μετά κολλήστε το στην βάση!Θα είναι έτοιμο μέσα σε 5 λεπτά!


Done :)
Έτοιμο :)

Tuesday, September 17, 2013

2 ring tutorials

We haven't been posting a lot recently because of the school which has unfortunately started :( but we haven't stopped creating!So today we got 2 tutorials in one post! Yay!

Δεν κάναμε πολλά ποστ τελευταία λόγω του ότι (δυστυχώς) άνοιξαν τα σχολεία :( όμως δεν έχουμε σταματήσει να δημιουργούμε!Οπότε σήμερα έχουμε 2 tutorials σε ένα ποστ!!


1


Its very simple you just glue the cabochon on the ring base.
Είναι πολύ απλό απλά κολλάτε το λουλουδάκι πάνω στη βάση.


It takes just 3 minutes and its sooo easy!
Παίρνει μόνο 3 λεπτά και είναι πανεύκολο!
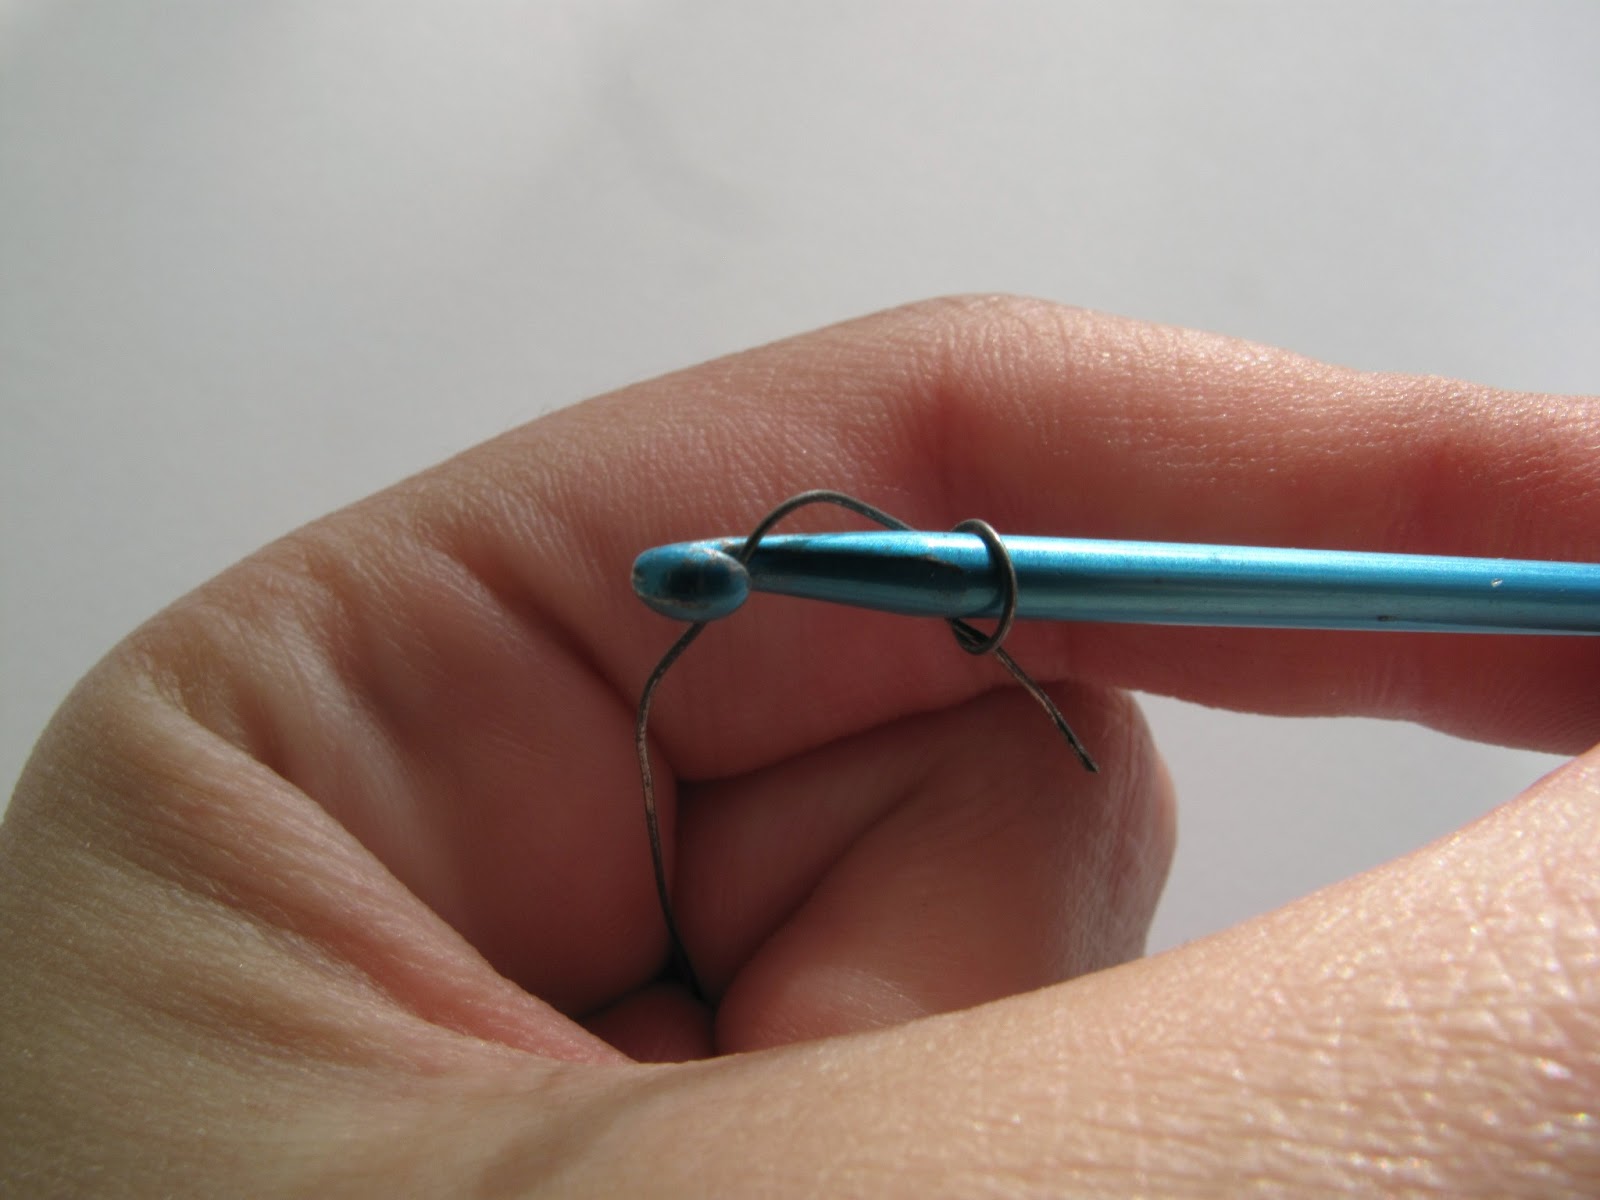
2


Thread the rose bead in some wire and create 1 loop in both sides like the picture.
Περάστε την χάντρα σε λιγο σύρμα και δημιουργήστε μια θηλιά σε κάθε πλευρά όπως στην φωτογραφία.


Connect a piece of chain to both loops (make sure that it fits in your finger!)
Ενώστε ένα κομμάτι αλυσίδας και με τις 2 θηλές (σιγουρευτείτε ότι εφαρμόζει στο δάχτυλό σας!)  


That was it! Here's both the rings!
Αυτό ήταν!Ορίστε και τα 2 δαχτυλίδια!


Upcoming tutorial:


Tuesday, July 16, 2013

Wire ring tutorial

Today's tutorial needs only a few supplies:
Το σημερινό tutorial χρειάζεται πολύ λίγα υλικά:


SUPPLIES
wire
one small bead
some chain

ΥΛΙΚΆ
σύρμα
μια μικρή χαντρούλα
λίγη αλυσίδα


Firstly form a word like ''love'' with some wire.Don't forget to add a bead in the process ;) it's all about the detail!Because I didn't manage to make a tutorial for this here's a link to another's blog tutorial : http://www.swellmayde.com/2013/01/valentines-diy-wire-love-ring.html

Αρχικά δημιουργήστε μια λέξη με σύρμα πχ love.Μην ξεχάσετε να προσθέσετε ανάμεσα μια χαντρούλα ;) σημασία έχει η λεπτομέρεια ! Επειδή δεν κατάφερα να κάνω tutorial  για αυτό ορίστε το λινκ για ένα παρόμοιο σε ένα άλλο μπλογκ:  http://www.swellmayde.com/2013/01/valentines-diy-wire-love-ring.html


Take a piece of chain which conbined with your word makes the size of your finger.With your pliers open the last link and pass it through the loop of the first letter.Close it.

Πάρτε ένα κομμάτι αλυσίδας το οποίο μαζί με την λέξη σας είναι στο μέγεθος του χεριού σας.Ανοίξτε τον τελευταίο κρίκο και περάστε τον στην θηλιά που δημιουργεί το πρώτο γράμμα.Κλείστε.

Repeat for the other side too!
Επαναλάβετε και για την άλλη πλευρά!

And you are done!
Και τελειώσατε!


Easy peasy!
Πανεύκολο!


Thursday, June 6, 2013

French coin ring tutorial

Hello !! I am sure you all have vintage coins and you don't know what to do with them so this tutorial is made for you <3<3  Today  we are going to make a vintage coin ring!!  
Γειά σας !!! Σίγουρα έχετε παλιά νομίσματα που δεν ξέρετε τι να τα κάνετε,έτσι αυτό το tutorial  είναι φτιαχμένο για εσάς!!Οπότε σήμερα θα φτιάξουμε ένα δακτυλίδι-νόμισμα   


You will need:
some glue 
a ring base 
and your vintage coin 
we have selected a french franc of 1951 whitch has a head on it 

Θα χρειαστείτε 
λίγη κόλλα 
ένα δακτυλίδι με βάση 
εμείς επιλέξαμε ένα γαλλικό φράγκο του 1951 με μία προτομή της εποχής    
                                                   Put the glue on the ring surface
                                    Βάλτε κόλλα στην επιφάνεια του δακτυλιδιού

                                  And stick the wrong side of the coin to the ring base

                              Και κολλήστε το νόμισμα από την ανάποδη πλευρα

Et voilà <3<3<3
                                  

                                               You can buy this french franc online
                          Μπορείτε να αγοράσετε αυτό το γαλλικό φραγκο στο ίντερνετ


Thursday, May 30, 2013

WIRE crochet ring tutorial

Hello !! today's tutorial is a wire crochet ring <3 !! It is so easy !!!It won't take you more than 3 minutes  

 Γεια σας !!! το σημέρινο tutorial είναι ένα πλέκτο δακτυλίδι από σύρμα !! Είναι πανέυκολο !!δεν θα σας πάρει περισσότερο από 3 λεπτά

You will need: 
scissors 
a crochet hook we  used the number 2,5
and some thin silver wire


Θα χρειαστείτε 
ένα ψαλίδι 
ένα βελονάκι νουμερο 2,5 
και  λεπτό σύρμα 

First with the wire make a knot around the crochet hook

Αρχικά με το σύρμα κάντε ένα κόμπο γύρω από το βελονάκι 

                                           Then wind the wire around the crochet hook


                                      Μετά τυλίξτε το σύρμα γύρο από το βελονάκι

                                                And wire it through the previous loop

                                   Και περάστε το μέσα από την προηγούμενη θηλιά

                                                   Repeat it for about 15-17 times

                                       Επαναλάβετε το για περίπου 15 με 17 φορές

                       Finally twist together the 2 edges and cut the rest of the wire with the scissors

        Τέλος γυρίστε μαζι και τις 2 άκρες και κοψτε το υπόλοιπο σύρμα με ένα ψαλίδι

Et voilà!!!


                                    You can also add some beads and create beautiful  rings

                                   Μπορείτε ακόμα να προσθέσετε μερικές χάντρες
                                   και να δημιουργήσετε πανέμορφα δακτυλίδια


Thursday, May 2, 2013

How to make your own ring base + button ring tutorial!

Hello!

Today we have two tutorials for you!
About the first one: If you,like us, are bored of going to the craft store to buy ring bases then this tutorial is for you!


SUPPLIES:
Something at the same size with your finger(We used a lip stick)
Some wire 
A wire cutter


Twist the wire about 2 or 3 times aroud the lip stick(so that it is steady)


then take one end and do the ''under and front'' movement


twist the ends of the wire


in the end it should look like this!Your base is ready!

Now for the ring:


SUPPLIES
wire cutter
the ring base you made
a strong glue
and any button you want(we used a vintage flower one)


cut this part of the button


then glue the ring base and the button together


Done!