Thursday, August 22, 2013

Polka dots wallet-purse


Γεια σας!! Πως περνάτε τις διακοπές σας;;;Αυτη τη φορά φτιάξαμε 2 πουα τσαντάκια-πορτοφόλια  ένα κίτρινο και ένα κόκκινο !! 
Hello!! How is your vacations going so far?This time we made 2 polka dots wallets-purses, a red and a yellow.

Για να φτιάξετε ένα τσαντάκι-πορτοφόλι   θα χρειαστειτε:
18Χ22 εκατ  πουά ύφασμα


18Χ22εκατ καρίνα που σιδερωνεται στο πουα ύφασμα σας για να γίνει πιο σταθερό και σκληρό. Αν το ύφασμα που αγοράσετε ειναι αρκετά σκληρό ή είστε ικανοποιημένοι με αυτο, δεν χρειάζεται να αγοράσετε καρίνα.


Σίδερο
Ραπτομηχανη
Κλοστή το ίδιο χρώματα με το ύφασμα σας
Ψαλίδι
Φερμουαρ
Βελόνα
Ασπρη κλοστή

To make the yellow polka dots purse-wallet you will need:

18X22 cm of yellow polka dots fabric

18X22 cm of  interfacing fabric(when you ironing it,it makes the polka dots fabric tougher and stabler.If the polka dots fabric that you bought is stable and though enough and you are satisfied with it, you don't have to buy the interfacing fabric.)


An iron

A sewing machine

Thread the same color as your fabric

Scissors

A zip
Sewing needle
White thread


Αρχικά στο  ύφασμα σιδερώστε την καρίνα που ανέφερα προηγουμένως απο την λεία πλευρά
First iron the interfacing fabric to the polka dots fabric from the soft surface.
Αφού το σιδερώσετε διπλωστε τις δυο άκρες του υφάσματος  όπως σας δείχνω στην εικόνα  για να γαζωσετε τη μια πλευρα του φερμουαρ ανάμεσα.


Then  fold the two edges of the fabric as it shown in the picture, to sew on the sewing machine the one edge of the zip between the two edges.
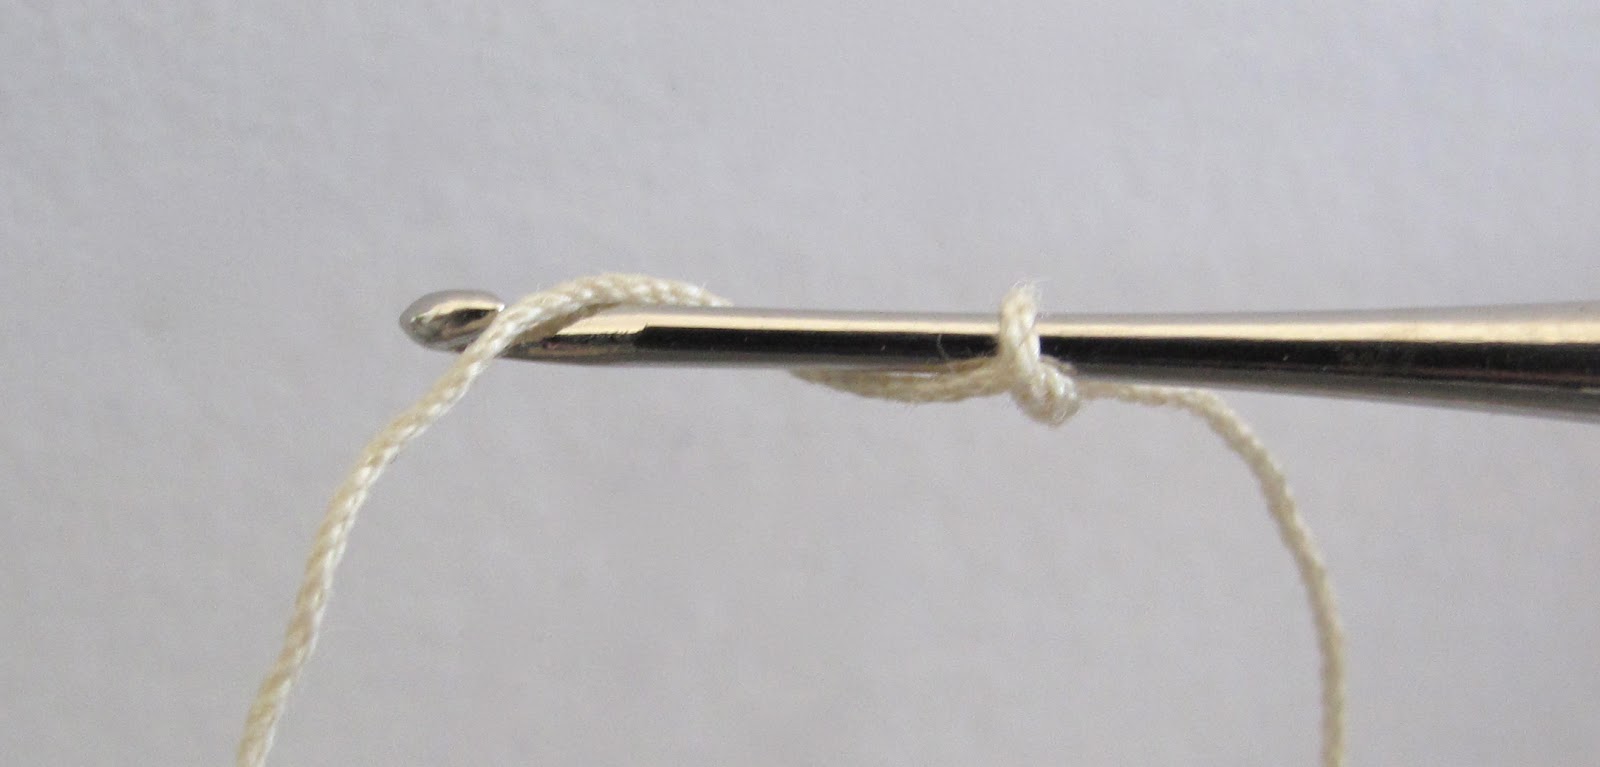
Τωρα περάστε (άσπρη)κλωστή στην βελόνα και με το χέρι σας κάντε ένα τρύπωμα δηλαδή μια προσωρινή ραφή για να στερεώσετε το ύφασμα στο φερμουαρ και να το γαζωσετε στην μηχανή πιο εύκολα !!


Now pass white thread through the needle and sew a tack ( a temporary seam) so that you can sew the zip easier using the sewing machine.
 Γαζώστε την μια πλευρα του φερμουαρ στο ύφασμα με την μηχανή.


Sew the one side of the zip to the polka dots fabric using the sewing machine.
Πάρτε το άλλο άκρο και κάντε το ίδιο και για την άλλη μεριά του φερμουαρ.

 Now take the other edge of the fabric and do what you did before for the other side of the zip.

Γυρίσετε το πορτοφόλι απο την ανάποδη πλευρά  δηλαδή με το φερμουαρ προς τα κάτω (οπου θα είναι η εσωτερικη πλευρα της τσαντας)και τρυπώστε τα πλαϊανά εκεί που θέλετε να ειναι τα όρια της τσάντας!!
Μετα γαζώστε στη μηχανη,εκεί που έχετε τρυπώσει.

Turn the wallet upside down,the zip should be from the wrong side,(where it would be the inside side of the wallet-purse) and sew tacks where you want the edges of the purse to be.Then sew using the sewing machine near the tacks.  
Εχετε σχεδόν τελειώσει το μονο που σας μένει είναι να γυρίσετε την εσωτερική πλευρά προς τα έξω!!
You are almost ready!!The only thing you have to do is turn the inside side of the back to outside.

Τέλος αφαιρέστε τα τρύπωματα
Finally remove the tacks.

Adorable <3

Tuesday, August 20, 2013

Rose earrings


 Για να φτιάξετε αυτά τα σκουλαρίκια θα χρειαστείτε:
To make these earrings you are going to need:


Χάντρες λουλουδάκια
Μερικό σύρμα
Βάσεις για σκουλαρίκια με θυλιά από κάτω
Λίγη αλυσίδα

Flower beads
Some wire
Rhinestone studs with loop
Some chain


Αρχικά δημιουργήστε μια θυλιά.
At first form a loop.


Μετά περάστε την χάντρα.
Then thread the bead.


Δημιουργήστε μια θυλιά και από την άλλη μεριά.
Then form another loop in the opposite side.


Περάστε την μια θυλιά της χάντρας στην θυλιά της βάσης.
Connect the stud and the bead with their loops.


Από την κάτω θυλιά περάστε 3 κομματάκια αλυσίδας: 2 ίδια και ένα μεγαλύτερο στην μέση.

From the bottom loop thread 3 pieces of chain:2 same and one longer in the middle.


Αυτό ήταν!Επαναλάβετε και για το άλλο σκουλαρίκι.
That was it!Repeat for the other earring.


Sunday, August 11, 2013

Crochet bracelet and headband.

Hello!!!Today i decided to remake  a project that i did a year ago when i knew only  the basics of crochet.It is so easy to make it and you don't need to know how to crochet.So i will show you how to make a crochet bracelet which also can be a headband!!<3<3
Γειά σας!!Σήμερα αποφάσισα  να ξανακάνω μια κατασκευή που έκανα πριν ένα χρόνο όταν ήξερα μόνο τα βασικά του πλεξίματος.Είναι τόσο εύκολο να το φτιάξετε που δεν χρειάζεται να ξέρετε να πλέκετε.Λοιπόν θα σας δείξω πως να φτιάξετε ένα πλεκτό βραχιόλι που ακόμα μπορείτε να το φοράτε και σαν κορδέλα!!  
 You will need:  
a crochet hook
scissors
and some crochet thread of your choice. 
Θα χρειαστέιτε: 
'ένα βελονάκι για πλέξιμο  
ένα ψαλίδι 
και κλωστή πλεξίματος της επιλογής σας. 
If you know how to crochet then you should do a crochet chain stitch about 100cm long.
If you don't know how to crochet i show you how to make the crochet chain stitch below. 
Εάν ξέρετε να πλέκετε κάντε αλυσιδάκι περίπου 100εκ μακρύ.
Άν δεν ξέρετε να πλέκετε παρακάτω σας δείχνω πως γίνεται το αλυσιδάκι .

                                    Make a slip knot and slide it onto the shaft of your hook.
Αρχικά κάντε ένα κόμπο γύρω από το βελονάκι. 

Then wind the thread around the crochet hook and pull it through the previous loop.
Μέτα τυλίξτε την κλωστή γύρω από το βελονάκι και περάστε την μέσα από την προηγούμενη θηλιά. 

 Repeat the same process.We want the row of crochet chain stitch to be about 100cm long.
Επαναλαύετε την ίδια  διαδικάσια .Θέλουμε τα "αλυσιδάκια" να είναι περίπου 100εκατ σε μάκρος.
 When you have crocheted 100cm of chain stitch make a knot at the ending and bond the two edges.  
'Οταν πλέξετε αλυσιδάκι μάκρους 100εκατ κάντε ένα κόμπο στο τέλος και ενώστε τα δύο άκρα. 

Wind it around your hand to make it a bracelet.!! 
Τυλίξτε το γύρω από το χέρι σας για να γίνει βραχιόλι .
 If you want you can hang a charm as i did!! 
Or wear it without a charm simple and lovely <3


Wind it 2 times around your head to make it and wear it as a headband too<3
Τυλίξτε το 2 φορές γύρω από το κεφάλι σας για να το φορέσετε και σαν κορδέλα <3 

And you are done<3<3<3 
So easy and simple!!

Και τελειώσατε<3<3<3
Τόσο εύκολα και απλά!!!

vintage flower bracelet


Αυτό το βραχιολάκι το έφτιαξα με χάντρες που αγόρασα από το Etsy.com .Αυτά τα λουλουδάκια νομίζω ότι έχουν γίνει ο νέος μου εθισμός οπότε θα τα ξαναδείτε σε μελλοντικά tutorials :) .

I made this bracelet with the beads I bought off Etsy.com .They have become my new addiction so you will defenitely see them in future tutorials :) .

ΤΟ TUTORIAL
ΤHE TUTORIAL


Αρχικά κάντε μια θηλιά με το σύρμα.
At first make a loop with the wire.


Μετά περάστε την χάντρα και φτιάξτε άλλη μια θηλιά στην άλλη μεριά.
Then thread the bead and make another loop in the other side.


Επαναλάβετε για τις υπόλοιπες χάντρες.Αφού τελειώσετε σχηματίστε ένα αλυσιδάκι ενώνοντας τις θηλιές.
Repeat for the rest of the beads.After you are finished form a ''chain'' by connecting the beads with the loops.


Όταν είστε στα μισά προσθέστε το λουλουδάκι με την ίδια τεχνική που χρησιμοποιήσατε και για τις άλλες χάντρες.
When you are halfway add the flower bead with the same technique you used for the blue beads.


Βάλτε κούμπωμα στην τελευταία χάντρα.
Add a clasp in the last bead.


Αυτά για σήμερα!
That's it for today!


Friday, August 2, 2013

Heart hair clips

Hello.Here is a tutorial on how to make your own hair clips.We made hearts hair clips!!!

Γειά σας!!! Να ένα tutorial για το πώς θα φτιάξετε τα δικά σας τσιμπηδάκια για τα μαλλιά!!!Εμείς φτιάξαμε τσιμπηδάκια καρδούλες!!!


You will need
red cardboard
white cardboard
scissors
liquid gloss
a brush
a pencil

Θα χρειαστέιτε
κόκκινο χαρτόνι
άσπρο χαρτόνι
υγρό γυαλί
ένα πινέλο
ένα μολύβι
ένα ψαλίδι

Draw and cut two red hearts and two white hearts.

Ζωγραφίστε και κόψτε 2 καρδιές σε άσπρ χαρτόνι και 2 σε κόκκινο.

Glue a white heart with a red heart(X2)Now with a brush paint the hearts with liquid gloss.Wait 4-6 hours.

Κολήστε μια άσπρη καρδιά με μια κόκκινη (X2)Kαι τώρα με ένα πινέλο απλώστε το υγρό γυαλί!Περιμένετε 4-6 ώρες για να στεγνώσει.


Take 2  black hair clips.

                                  Πάρε 2 μαύρα τσπιμπηδάκια μαλλιών(φουρκέτες)


And glue the hearts to the clips.

Kαι κολήστε τις καρδιές στα τσιμπηδάκια

And you are done <3<3
Και τελειώσατε <3<3