Sunday, June 30, 2013

Oreo cookie mold !!

Hello !!! How was your week ? Here is an oreo mold tutorial for you !!! Molds are the easiest way to make an exact copy of any item !!!So we made an oreo necklace <3<3

Γειά σας !!Πώς περάσατε την εβδομάδα σας?? Για σας έχουμε ένα tutorial για το πως να φτίαξετε το δικό σας καλούπι από ένα oreo (μπισκότο) !Τα καλούπια είναι ο ευκολότερος τρόπος για να φτιάξετε ένα ακριβές αντίγραφο από οποιοδήποτε αντικείμενο!!Οπότε εμείς φτιάξαμε ένα oreo κoλιέ<3<3  


Take your oreo cookie and put it in the refrigerator for about 3-5 minutes, so it won't break later !!

Πάρτε το oreo μπισκότο σας και βάλτε το στη κατάψυξη για 3-5 λεπτα, για να μην σπάσει αργότερα !! 

Now take your mold putty,we used sili-put ( you can find it on eBay)
and take out a  big ball of part A and an equal ball from part B!!Mix the 2 balls until they become one color!

Τώρα πάρτε το mold putty σας,εμέις χρησιμοποιήσαμε το sili-put (μπορείτε να το βρείτε στο ebay) και βγάλτε μια μεγάλη μπάλα από το δοχείο Α και μια από το δοχείο Β με το ίδιο μέγεθος !!Αναμείξτε τις 2 μπάλες μέχρι να γινούν ένα χρώμα !


 Now turn the wright side of the cookie up and roll the putty over the oreo cookie

Τώρα γυρίστε το μπισκότο από την πάνω πλευρά και κάλυψτε το με το putty
 Wait 25-30 min for the mold putty to harden,take out the oreo cookie and here you gooo !! You have your own oreo cookie mold !!<3<3

Περιμένετε 25-30 λεπτά μέχρι να σκληρύνει το mold putty και βγάλτε το oreo !!Και τελιώσατεε<3<3
You can create Oreo necklaces out of polymer clay and earrings in every color you like <3<3   

Τώρα μπορείτε να δημιουργήσετε  Oreo κολιέ από φίμο οπώς και σκουλάρικια ...  σε ό,τι χρώμα θέλετε <3 


Find Oreo cookies,mini oreo cookies and Haribo necklaces at www.prettylittlecharm.com

Βρείτε τα Oreo,mini Oreo και Haribo κόλιε στο  www.prettylittlecharm.com


Monday, June 24, 2013

Sea glasses bottle charm

Hello !!
 Because summer has arrived and we spent the most time at the beach, we often collect pebbles and sea glasses , we got inspired by that fact and we made this special summer tutorial !!! A necklace bottle charm  filled with  sea glasses!!

Γειά σας !!! 
Επειδή έφτασε το καλοκαίρι και περνάμε τον περισσότερο χρόνο μας στην παραλία, συχνά μαζέυουμε βότσαλα και "γυαλάκια της θάλασσας" ! Από αυτό το γεγονός εμπνευστήκαμε και φτιάξαμε αυτό το ξεχωριστό καλοκαιρινό tutorial!! Ενά κολιέ μπουκάλι με γυαλάκια της θάλασσας !!


You will need:
some sea glasses 
a bottle charm 
Sculpey satin gloss or olive oil
a paint brush 
1m of gold necklace  

Θα χρειαστείτε 
γυαλάκια της θάλασσας 
ένα μπουκαλάκι
Sculpey satin gloss ή ελαιόλαδο 
ένα πινέλο 
1μ χρυσή αλυσίδα 


Here are the sea glasses that i found 

Εδώ είναι τα γυαλάκια που βρήκα


 First glaze your sea glasses! 
(For those of you that you don't have  sculpey satin glaze  you can find it on ebay or you can use olive oil to glaze the sea glasses)

Αρχικά με  το πινέλο σας και το sculpey γυαλίστε τα γυαλάκια της θάλασσας (Αν δεν έχετε sculpey satin glaze μπορείτε να το παραγκείλετε από το ebay ή να γυαλίσετε τα γυαλάκια με ελαιόλαδο)


Wait 3 minutes for the sea glasses to dry and  put them in the bottle charm !!Then adjust the gold chain and you are done <3<3 
so simple <3<3   
Περιμένετε 3 λέπτα για να στεγνώσουν τα γυαλάκια και τοποθετήστε τα στο μπουκαλάκι! Μετά βάλτε την χρυσή αλυσίδα και τελειώσατε !!!
Τόσο απλά <3<3


Sunday, June 23, 2013

Holiday kit

So, today we came across this picture from the site ftiaxto.gr
Σήμερα βρήκαμε αυτήν την φωτογραφία από το site ftiaxto.gr


It is a holiday kit for crafters which contains sewing and beading materials,pens etc.
You can read the article here

Είναι ένα kit χειροτεχνίας που περιέχει υλικά για ράψιμο και κατασκευές με χάντρες,στυλό κτλ.
Μπορείτε να διαβάσετε το άρθρο εδώ.

Inspired by this article we present you the beach crafting kit!Ok it's nothing special but since it's summer and everyone goes to the beach we thought it would make a good post.SO, here's a small list with things you should carry when going to the beach so that you won't get bored.

Εμπνευσμένες από αυτό το άρθρο σας παρουσιάζουμε το kit χειροτεχνίας για την παραλία!Εντάξει δεν είναι και τίποτα το ιδιαίτερο απλά επειδή είναι καλοκαίρι και ΌΛΟΙ πηγαίνουν στην παραλία πιστεύουμε ότι θα ήταν καλό θέμα για post.Λοιπόν,ορίστε μια μικρή λίστα με πράγματα που θα πρέπει να κρατάτε στην παραλία για να έχετε κάτι να ασχολείστε.


  1. Markers and pens ( for drawing on pebbles)
  2. strong glue ( for glueing shells)
  3. scissors ( believe me they are usually useful)
  4. if you don't want to make something, you can take a crafts magazine
  5. nail varnish (to varnish the pebbles so that they keep looking the same as when they are in the sea)
  1. Μαρκαδόροι και στυλό ( για να ζωγραφίζετε πάνω στις πέτρες)
  2. δυνατή κόλλα ( για να κολλάτε κοχύλια)
  3. ψαλίδι ( πιστέψτε με είναι χρήσιμο)
  4. αν δεν θέλετε να φτιάξετε κάτι μπορείτε να πάρετε ένα περιοδικό χειροτεχνίας
  5. nail varnish δηλαδή διαφανές μανό για τα νύχια ( για να γυαλίσετε τα βότσαλα ώστε να συνεχίσουν να γυαλίζουν όπως όταν ήταν στην θάλασσα)


Ierapetra beach.
Η παραλία της Ιεράπετρας.


pebbles
βότσαλα


That's it for today.
Αυτά για σήμερα.


Saturday, June 22, 2013

How to wear your lace shorts

Hello !! Today we also  have a showcase for you !
We will show how to wear your lace shorts !

Γειά σας !! Σήμερα έχουμε και κάτι ακόμα για εσάς !
Θά σας δείξουμε πως μπορείτε να συνδυάσετε το δαντελωτό σορτσάκι σας !


 You can wear it with a blue top

Μπορείτε να το φορέσετε με ένα μπλέ μπλουζάκι
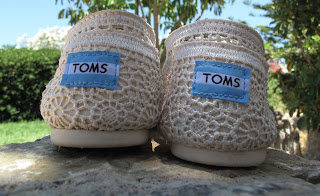
And Toms lace shoes
Και άσπρα Toms με δαντέλα


So simple <3


Just a birthday present

For today's post no tutorial is needed.It is just a simple necklace for a friend who has birthday.
Δεν χρειάζεται tutorial για το σημερινό ποστ.Είναι ένα απλό κολιέ για μια φίλη που έχει γενέθλια.


the clasp
το κούμπωμα


 We found these at Amazon.co.uk just type folding crimps cord ends and you will find many options.
Τα βρήκαμε στην ιστοσελίδα Amazon.co.uk.Απλά πληκτρολογήστε folding crimps cord ends και θα σας εμφανιστούν πολλές επιλογές!  


Friday, June 21, 2013

Lace shorts

Hello!! Here is another tutorial for today !!We are going to show you how to make these cute 
lace shorts <3<3
Γειά σας !!!! Έχουμε ένα ακόμη tutorial για σήμερα!!Θα σας δείξουμε πως να φτίαξετε αυτό το δαντελωτό σορτσάκι <3<3


You will need :
a pair of shorts ( we used size small)
about 6m of lace or more depending on what size of shorts you will use 
scissors
a skein of thread 
and a sewing needle 


Θα χρειαστείτε :
ένα σορτσάκι (χρησιμοποιήσαμε νούμερο small)
Περίπου 6μ δαντέλα, αναλόγως τι νούμερο σορτσάκι θα χρησιμοποιήσετε 
ένα ψαλίδι
κλοστή 
και μία βελόνα ραψίματος  

 (We used 1m of the second lace,2m of the first and 2m of the last lace)
(Χρησιμοποιήσαμε 1μ από τη δεύτερη δαντέλα,2μ από τη τελευταία και 2μ από τη πρώτη)
 Begin by pining the flower lace onto the top of the shorts, going all the way around so that it covers both the front and the back. Now sew it in place !!

Αρχίστε με το να καρφιτσώνετε την δαντέλα με τα λουλουδάκια στο πάνω μέρος του σόρτς, τυλίξτε την γύρω από το σορτσάκι έτσι ώστε να καλύψει την μπροστά και την πίσω πλευρά!Τώρα ράψτε την !!
 Do exactly the same (pining and sewing),for the other 3 layers of lace !
Κάντε ακριβώς το ίδιο για τις άλλες 3 σειρές δαντέλα !

                                                                        1

                                                                     2


3


Now you will need to pin and sew 2 rows of lace for each leg

 Τώρα θα χρειαστεί να καρφιτσώσετε και να ράψετε 2 σειρές με δαντέλα για κάθε μπατζάκι
                                                                  
                                                           
                                                                   1


                                                                       2


And you are done <3<3<3 :D
Και τελειώσατε <3<3<3:D


Buttons,buttons,buttons

Hello!How are you today ? Have you noticed something different??
We,the two bloggers,met yesterday and changed some things.We changed the layout and made a new logo (with our creations in this blog) and added google translate for you ( if you aren't Englisch-American or Greek) ! Be sure to vote (on the right) for what you would like to see on this blog!;)

Γεια σας! Πώς είστε σήμερα; Μήπως έχετε προσέξει κάτι διαφορετικό;;
Χθες συναντηθήκαμε ( εμεις,οι 2 bloggers) και αλλάξαμε μερικά πράγματα.Αρχικά αλλάξαμε την διάταξη , φτιάξαμε νέο logo (με τις δημιουργίες μας από αυτό το μπλογκ) και προσθέσαμε google translate!Επίσης διοργανώσαμε μια ψηφοφορία ( στα δεξιά) οπότε σιγουρευτείτε ότι θα ψηφίσετε ;)

on to the tutorial!
Πάμε τώρα στο tutorial!On to the tutorial!

Inspiration: 
Έμπνευση:

from the blog : the real housewives
από το μπλογκ : the real housewives

When I saw this I knew I had to make it since I want to get rid of my many buttons. I didn't have red buttons so I used different colors.

Οταν το είδα ήξερα ότι έπρεπε να το φτιάξω αφού θέλω να ξεφορτωθώ τα πολλά κουμπιά μου.Δεν είχα κόκκινα κουμπιά οπότε χρησιμοποίησα διαφορετικά χρώματα.


To begin with, with the tape you make the desired shape and then paint the whole canvas.After it is dry you peel of the tape.
Αρχικά, με κολλητική ταινία σχηματίζετε το σχήμα που θέλετε και μετά βάψτε όλο τον κανβά.Αφού στεγνώσει αφαιρέστε την ταινία.


Now its time for the fun part.Collect your buttons and decide which you are going to use.(You don't need so many buttons as in the picture but you get the idea)
Τώρα ήρθε η ώρα για το ωραίο μέρος.Μαζέψτε τα κουμπιά σας και αποφασίστε ποια θα χρησιμοποιήσετε(Δεν θα χρειαστείτε  τόσα πολλά κουμπιά όσα στην φωτογραφία αλλά παίρνετε μια ιδέα.)


Plan where you are going to place them.
Αποφασίστε πώς θα τα βάλετε.


And start gluing them in place!
Και αρχίστε να τα κολλάτε στη θέση τους!


In case you have that kind of buttons just cut their tip with the wire cutter.
Σε περίπτωση που έχετε τέτοια κουμπιά απλά κόψτε την άκρη τους με το κόφτη σύρματος.

\
It should look like this.
Τώρα θα έπρεπε να είναι κάπως έτσι.


For a more 3D look add a second layer of buttons.
Για να δείχνει πιο τρισδιάστατο προσθέστε μια επιπλέον στρώση με κουμπιά.


And you are done,as simple as that!It makes a perfect gift.'
Και τελειώσατε,τόσο απλά!Επιπλέον θα ήταν τέλειο δώρο.